
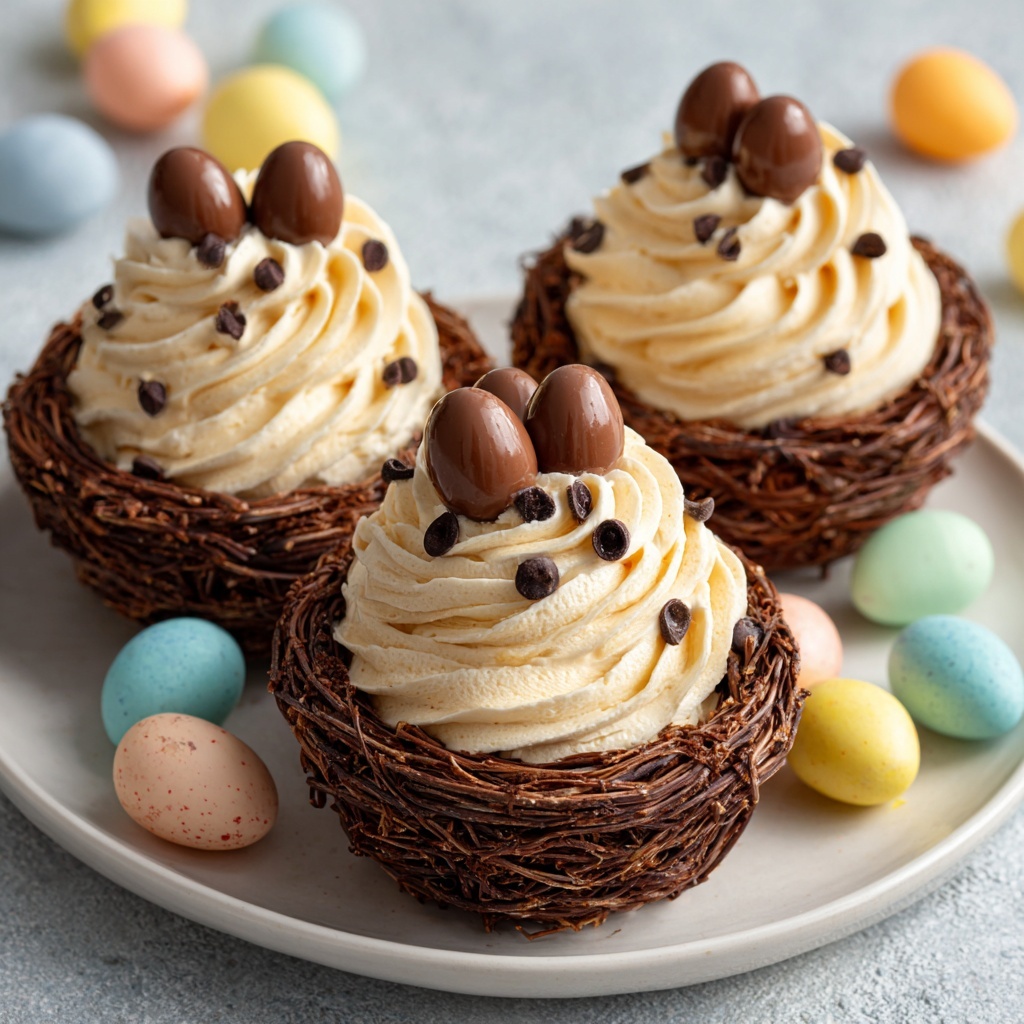
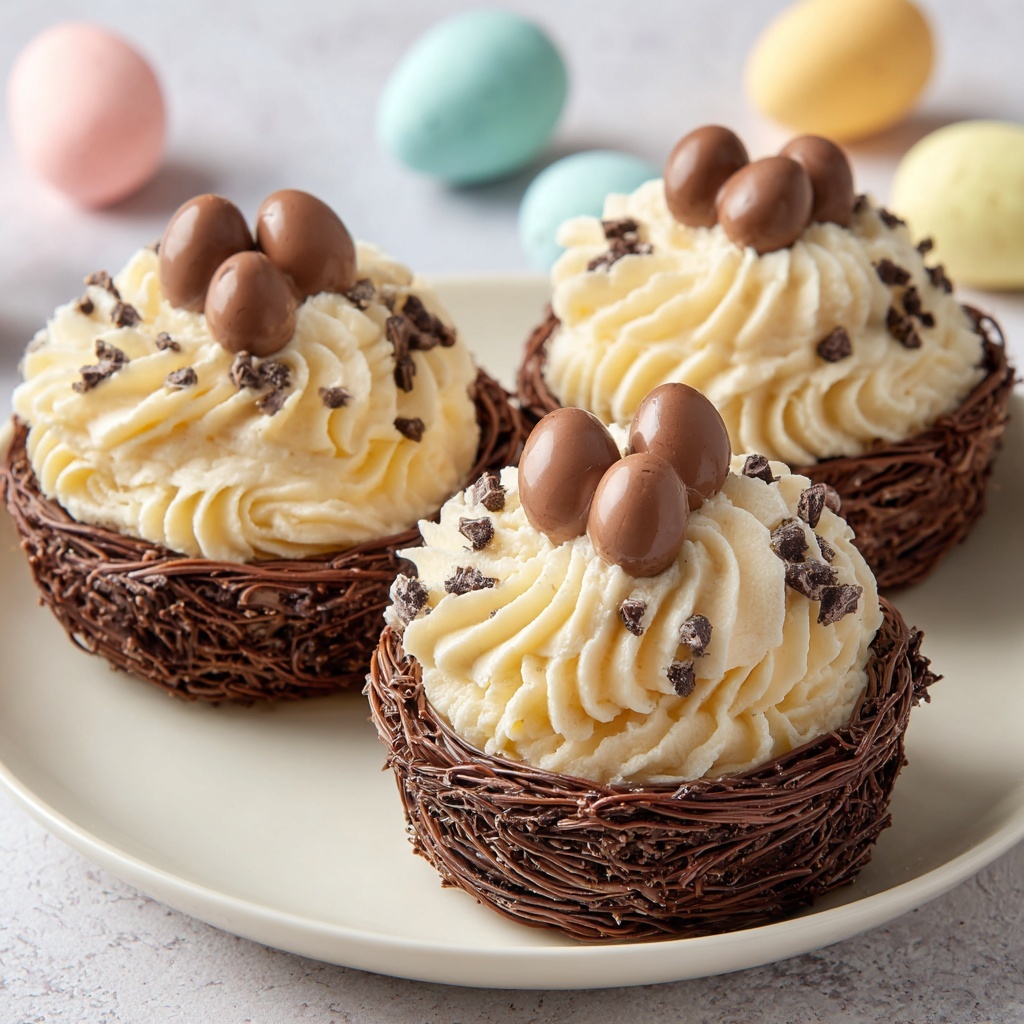
If you’re looking to add an irresistibly delightful and festive touch to your Easter celebrations, this Chocolate Meringue Easter Nests Recipe is an absolute must-try. Imagine crisp, delicate cocoa-flavored meringue shaped into charming little nests, filled with luscious whipped cream or rich chocolate ganache, and crowned with colorful mini chocolate eggs. Each bite offers a perfect harmony of airy sweetness, deep chocolate notes, and playful textures that will have your family and friends coming back for more. It’s not just a dessert — it’s a joyful experience that captures the spirit of spring and Easter in every nest.
Ingredients You’ll Need
The beauty of this Chocolate Meringue Easter Nests Recipe is how it relies on a handful of simple ingredients, each playing a crucial role in flavor, texture, and presentation. These essentials combine to create a treat that’s both elegant and approachable.
- 4 large egg whites: The foundation for our airy and light meringue texture.
- 1 cup granulated sugar: Adds sweetness and stability to the meringue’s glossy peaks.
- 1/4 teaspoon cream of tartar: Helps stabilize the egg whites for maximum volume.
- 1/4 teaspoon salt: Enhances the overall flavor and balances the sweetness.
- 1/2 teaspoon vanilla extract: Provides a warm, fragrant note that complements the chocolate beautifully.
- 2 tablespoons unsweetened cocoa powder (sifted): Infuses the nests with rich chocolate flavor and a subtle earthy tone.
- 1/2 cup semi-sweet chocolate chips (melted): For drizzling inside the nests to add decadent richness.
- 1 cup whipped cream or chocolate ganache (for filling): Adds creamy indulgence to contrast with the crisp meringue.
- 1/2 cup mini chocolate eggs or candy-coated eggs (for topping): The festive finishing touch that makes these nests perfect for Easter.
How to Make Chocolate Meringue Easter Nests Recipe
Step 1: Prepare Your Oven and Baking Sheet
Start by preheating your oven to 225°F (110°C). Line a baking sheet with parchment paper to prevent sticking and to make cleanup easier. Having these ready upfront sets you up perfectly for success with your meringue nests.
Step 2: Beat the Egg Whites
Using a clean, dry mixing bowl, beat the egg whites at medium speed until they become foamy. This first stage breaks them up and starts the aeration process that will give your nests their signature lightness.
Step 3: Add Stabilizers and Sugar
Add in the cream of tartar and salt, then continue beating until soft peaks form. Gradually add the granulated sugar one tablespoon at a time, increasing to high speed, until you reach stiff, glossy peaks and the sugar is fully dissolved. This step is crucial to achieving that beautiful, glossy meringue that holds its shape.
Step 4: Incorporate Flavor and Cocoa
Gently fold in the vanilla extract and sifted cocoa powder until just combined. Careful folding keeps the air in the mixture intact while introducing the lovely chocolate flavor and slight richness that makes these nests so special.
Step 5: Shape the Nests
Transfer the meringue to a piping bag fitted with a large star tip. Pipe 3-inch circles onto your prepared baking sheet, then carefully build up the edges to create a nest-like shape. This creative step shapes your nests and gives them that classic Easter feel.
Step 6: Bake and Cool
Bake the nests for 1 hour at 225°F, then turn off the oven but leave the meringues inside to cool completely for another hour. This slow cooling helps to dry them out gently, ensuring a crisp shell and tender interior.
Step 7: Add Chocolate Drizzle and Fillings
Once your nests have cooled, drizzle melted chocolate inside the base of each one and let it set. Afterward, fill the nests with whipped cream or a luscious chocolate ganache, then top with mini chocolate eggs or candy-coated eggs to finish off with that festive pop.
How to Serve Chocolate Meringue Easter Nests Recipe
Garnishes
Fresh berries like raspberries or strawberries can add a burst of freshness and color to your nests. A light dusting of powdered sugar also creates a delicate, snow-kissed look perfect for springtime. These garnishes complement that chocolaty sweetness with natural brightness.
Side Dishes
Pair these nests with a simple fruit salad or a refreshing mint tea to cleanse the palate between bites. Since the dessert is quite rich and sweet, light accompaniments perfectly balance the meal while keeping the focus on your beautiful nests.
Creative Ways to Present
Serve your nests in clear glass dessert bowls to showcase their layered beauty or on rustic wooden boards for a charming, farmhouse-style Easter table. You can even place them inside pastel Easter baskets lined with shredded paper for a fun and festive presentation kids will love!
Make Ahead and Storage
Storing Leftovers
Unfilled meringue nests can be stored in an airtight container at room temperature for up to three days without losing their crispness. Keep them away from moisture and humidity to maintain that delightful texture.
Freezing
These nests do not freeze well once filled due to the whipped cream or ganache. However, you can freeze baked, unfilled meringue nests for up to one month. Thaw them in a dry place before adding your fillings and toppings for best results.
Reheating
Because meringues are delicate, avoid reheating filled nests. If you want to crisp up stale nests slightly, place unfilled ones in an oven at low heat (about 200°F or 95°C) for 5–10 minutes, but be cautious not to brown or burn them.
FAQs
Can I use a different type of chocolate for the drizzle?
Absolutely! You can use dark, milk, or white chocolate depending on your flavor preference. Just melt it gently and drizzle as usual to add your personal touch.
Is it necessary to use cream of tartar?
Cream of tartar helps stabilize the egg whites and creates stiffer peaks, but if you don’t have it, you can use a small pinch of lemon juice or white vinegar as a substitute.
Can I make these nests dairy-free?
Yes! Use coconut whipped cream or another plant-based whipped alternative to fill the nests. Just ensure your chocolate chips are dairy-free as well.
What if my meringue doesn’t form stiff peaks?
Make sure your mixing bowl and beaters are completely clean and dry, and that no yolk has mixed with the whites. Also, beat the whites at a moderate speed and add sugar gradually. Fresh eggs tend to work best.
How do I make the nests crispier?
You can leave the baked meringue nests in the turned-off oven overnight to dry out further, resulting in a crispier texture that holds up beautifully when filled.
Final Thoughts
Trust me, once you try making this Chocolate Meringue Easter Nests Recipe, it will quickly become a cherished favorite for Easter and beyond. The combination of airy meringue, rich chocolate, and festive eggs creates a dessert that’s as fun to make as it is to eat. So grab your piping bag, gather those ingredients, and get ready to impress your loved ones with a sweet springtime treat that truly dazzles!
Print
Chocolate Meringue Easter Nests Recipe
- Prep Time: 25 minutes
- Cook Time: 1 hour
- Total Time: 1 hour 25 minutes
- Yield: 8 nests
- Category: Dessert
- Method: Baking
- Cuisine: American
- Diet: Gluten Free
Description
Delight in these elegant Chocolate Meringue Easter Nests, perfect for spring celebrations. Crispy on the outside with a light, airy texture inside, these nests are infused with cocoa and filled with creamy whipped cream or rich chocolate ganache, then topped with colorful mini chocolate eggs for a festive touch.
Ingredients
Meringue
- 4 large egg whites
- 1 cup granulated sugar
- 1/4 teaspoon cream of tartar
- 1/4 teaspoon salt
- 1/2 teaspoon vanilla extract
- 2 tablespoons unsweetened cocoa powder, sifted
Chocolate Drizzle
- 1/2 cup semi-sweet chocolate chips, melted
Filling and Topping
- 1 cup whipped cream or chocolate ganache (for filling)
- 1/2 cup mini chocolate eggs or candy-coated eggs (for topping)
Instructions
- Preheat oven and prepare baking sheet: Preheat the oven to 225°F (110°C) and line a baking sheet with parchment paper to prevent sticking.
- Beat egg whites: In a clean, dry mixing bowl, beat the egg whites on medium speed until they become foamy, which helps to incorporate air for volume.
- Add stabilizers: Add the cream of tartar and salt to the egg whites and continue beating until soft peaks form, providing structure to the meringue.
- Incorporate sugar: Gradually add sugar, one tablespoon at a time, while beating on high speed until stiff, glossy peaks form and the sugar is completely dissolved, ensuring a smooth meringue texture.
- Fold in flavorings: Gently fold in the vanilla extract and sifted cocoa powder until just combined, carefully maintaining the meringue’s airiness.
- Pipe nests: Transfer the meringue mixture to a piping bag fitted with a large star tip and pipe 3-inch circles onto the parchment-lined baking sheet. Build up the edges to form a nest shape to hold the filling later.
- Bake the meringues: Bake in the preheated oven for 1 hour to dry out the nests slowly without browning.
- Cool in oven: After baking, turn off the oven and leave the meringues inside for another hour to cool gradually, which helps prevent cracking.
- Drizzle melted chocolate: Once cool, drizzle the melted semi-sweet chocolate into the bottom of each nest and allow it to set, adding a delicious chocolate layer.
- Fill and decorate: Fill each nest with whipped cream or chocolate ganache and top with mini chocolate eggs or candy-coated eggs to create a festive appearance perfect for Easter.
Notes
- Store unfilled meringue nests in an airtight container for up to 3 days to maintain crispness.
- For flavor variation, try filling nests with flavored ganache or lemon curd instead of whipped cream.
- For an extra crispy texture, let the baked meringues dry overnight in the turned-off oven.


